Showing posts with label rosehaven cottage. Show all posts

If I always expect the unexpected, then nothing is truly "unexpected", right?


My "super wise" epiphany for today... if I always expect the unexpected, then nothing is truly "unexpected".

It came to me in the shower (as many "super wise" epiphanies do). I don't know... maybe I've been absorbing something while watching Sherlock, but it seems logical when I think about it. It is particularly applicable to home construction.

So when Hubby finished pulling down all the ancient sheet rock left on the framing in the garage that will be my studio some day, it was not unexpected that more wood rot was uncovered... because I've come to expect stuff like that. Luckily, it is wood rot that's just as ancient as the sheet rock. It's leftover from when the garage had its original flat roof (pre-1960s) probably when it was still an open-sided carport. There must have been a leak in the roofing that caused rain to wick down along the framing just enough to create some wood rot. It isn't much and is isolated to a couple of studs, so the fix is relatively straightforward. Hubby just needs to sister in some new studs alongside the compromised ones.

When we determined that we would be plunging into this latest home renovation adventure, we both expected things to go any way but straightforward, simple and swiftly. Again... expecting the unexpected. So that is why I am not posting photo after photo of progress with this project.

Over 13 years ago after optimistically thinking we could renovate/rehabilitate our entire home in 2-3 weeks, we learned that nothing goes quickly when it comes to this house.

Why, you ask? Just in case any of you have the idea that you'd like to tackle a similar adventure (and prove us wrong), keep these things in mind as you plan your renovation/rehabilitation timeline:

  • Expect any vintage home that was custom-built by the owner (particularly if the owner wasn't a contractor) to have weird quirks because everything is "unique" (we've sometimes used other choice words to describe some non-contractor-owner-builder choices we've uncovered)
  • Expect any vintage home that has had annexes built onto the original footprint to have multiple eras of construction materials represented as well as odd connection points or hidden damage from before the annex was constructed
  • Expect any vintage home built prior to 1960 to have construction that is sub-standard according to current building codes
  • Expect any vintage home that has gone through a period of dilapidation or neglect to have even more weird quirks than one that has been lovingly maintained over the years since it was built

So... from those of you that have been through this adventure already...  are there any other bullet points I should have included above?

Pin It!

I'm declaring it here and now... I love classic beauty


"I love classic beauty. It's an idea of beauty with no standard." 
~Karl Lagerfeld

I've been keenly aware of my interior design aesthetics the past 6 months or more. It started when I decided to create a Pinterest board called "Finding my interior design style" after reading a very well written blog series entitled "How to Overcome Decorating Paralysis" at Fieldstone Hill Design. I saw the article pinned on Pinterest and despite the fact I was feeling just the opposite of "decorating paralysis", I clicked through and read it out of curiosity. I ended up with some epiphanies I hadn't anticipated.

I've felt like I've made some good choices when designing our cottage's renovations over the past 13 years, but was frustrated that I seemed to be making choices that didn't have as much lasting power as I'd initially hoped they would. I was wanting to change things after only a few years that were supposed to never be changed as long as we lived here (50+ years). Through the series mentioned above (particularly the Personal Style Boot Camp) I discovered that I had to define some "don't buy words"--style definitions of things that I'm lured to but are, in fact, my design "kryptonite".

Here's an example of what I mean... my head is easily turned by mid-century malt shoppe/soda fountain/diner decor, colors and accessories. I will ignore all else if I see something in that style. But (and this is a big BUT) 50's diner/malt shoppe kitsch in my own home doesn't really sit well with me for very long. It's too busy... too much like a movie set... too kitsch-y for my long-term aesthetic. As stated in the blog series that enlightened me, "...it ultimately will not have 'staying power' in my home".

Once I read that, I felt free for the first time in a long time! And I could finally declare that what did have staying power in my home was classic beauty—the kind of design that could be hundreds of years old or brand-spanking-new and you'd have a hard time discerning which it was. The classic design that emerged in the early part of the 20th century is a great example because you can see it in very modern homes today and it doesn't look dated.

My other realization was that just because something was "vintage" or "antique" didn't mean it belonged in my design aesthetic. And just because something was "new" or "modern" didn't mean it was verboten. I could mix the two and be quite happy... so happy that I never feel the need to change out that design element ever again.

Man, I wish I'd had Pinterest 13 years ago. I really REALLY wish I had. Fortunately, I'm resourceful enough and thrifty enough that I'll figure out ways to switch to my real design aesthetic without spending a lot of money.

And I just have to keep telling myself, "Lesson learned... move forward" instead of looking back and bemoaning my previous choices. I think that will be a bigger challenge than the actual work. In fact, I know it will.


Pin It!

Dahlias that never stood up straight or "The Dahlia Principle"

photos taken in Golden Gate Park

Years ago I wrote a blog post about how my dahlias never stood up straight. No matter what I did or what measures I took, when the dahlias would grow they'd always grow sideways with large green serpentine stems stretching out horizontally instead of vertically. It seemed like something so straightforward. You put the bulb in the ground. The flower grows straight up from the ground. The flower blooms and looks like all the other dahlias you've ever seen. Easy peasy, right? Not so in my case. It's like their "dahlia dna" got the wrong set of instructions. It wasn't the weight of the blossom that caused it because they'd start growing like that long before there were flowers. It was maddening. One year, those dahlias didn't come back. Something must have eaten their bulbs. I never bothered to replace them. I decided to just admit defeat and learn to appreciate dahlias in other gardens besides my own (the photos in this post were taken outside the Conservatory of Flowers in Golden Gate Park in San Francisco).

This weird dahlia problem is somewhat of a symbol for certain things in my life. No matter how hard I may try to prevent some cyclical patterns from repeating themselves, I can't. I end up either having to adapt or just admit defeat and move on.


Case in point... after 13 years of living through restoration/remodeling projects in this house Hubby and I know that no matter how straightforward a project appears to be at the onset, something will crop up that puts it into the "difficult" or "Man, I didn't see that one coming" category. It is a general rule we've come to have a sense of humor about (believe me, it took a long time to get to the point where we could chuckle about this phenomenon). We've actually come to expect it--particularly when others besides ourselves are doing the work.

Sometimes we've called it "the Home Depot Curse". That term came about because whenever we’d get into a line to checkout at Home Depot with a cart full of supplies, the customer ahead of us would suddenly have an issue with their purchase—their card would decline, a bar code wouldn’t work on an item, or something else would occur that the cashier insisted “had never happened before”. If anything happened when we were standing in line, we felt an obligation to apologize to whomever was standing in line in front of us or behind us by saying, “Sorry. It’s us. We have ‘The Home Depot Curse’.” We got to the point where we'd split up and have one of us stand in one line and the other in another line and then whichever line "broke down", we'd switch to the other person's line. When my brother was helping us with major construction, we'd split into three different lines and really fake out "the curse".

At other times, we've simply said, "We've got the Midas touch in reverse. Instead of everything we touch turning to gold, everything we touch turns to crap." That started to sound too cynical and faithless for our spiritual and good-natured sensibilities, so over time we abandoned that notion and phrase.

I think I'll call it the "Dahlia Principle" from now on. It sounds much nicer than either of the first two nicknames, don't you think?


We've had the weirdest things imaginable happen during the course of our home improvement adventures. While digging trenches for french drains around the perimeter of the house several years ago (another seemingly straightforward undertaking), we unearthed counterfeited engraving plates buried by the former owner's felonious son who was involved in many nefarious activities including counterfeiting checks. A phone call later and we had a member of the sheriff's department collecting the evidence as we all stood next to the small trench. After taking the evidence and our statement, the sheriff's deputy parted with a smile and a chuckle and said, "Give us a call if you dig up anything else... like a dead body." Thanks officer.

That gives you an idea of how bizarre things can get around here.

So in case anyone is wondering why I haven't written an update on the progress of our latest remodeling project, know that the "Dahlia Principle" is in full swing right now. The wonderful and competent contracting company that we hired to do our drainage and foundation footing across the front of the garage has been sucked into the vortex that is our lot in life when it comes to home improvement. A seemingly straightforward day-and-a-half job has turned into much more than that. Everything is on hold until they can find a slot in their schedules to come back and resolve things.

Sorry... I guess I should have warned them.

The good news is that while digging to install the foundation, they didn't find anything that warranted calling the sheriff's department. That's a good thing, right?

Pin It!

Chapter 13 (cont): New beginnings and promising horizons


I never thought I'd love the sight of a safety-orange traffic cone as much as I do the two that are sitting in front of our garage right now.

The work crew was back today bright-eyed and raring to go... except they got word from the county inspector that the inspection would be happening between 1 and 4 p.m. instead of the preferred time in the a.m.

So that kinda put a damper on the crew's plans... kinda...


Most work crews would just kick back and hang out until the inspector came. But not these guys. They had other tasks they could do without the inspector's visit. So they dove right in and hooked up the drains and pipes, drilled into the side of the subterranean storm drain box, created a connection to the downspout coming off the eaves, and finalized them all before the inspector got there. Nice.


Look at how beauteous the connection is on that downspout (below). You have no idea the relief I feel knowing the winter rain will go right down that tube and back to the storm drain instead of gushing out right in front of the garage door.  


In all the excitement of actually getting this job done, I had forgotten that there would be two drains! One drain is in the driveway (below) and the other is in the middle of the utility area of our side yard (above). No more slogging through ankle-deep water in my Sunday shoes on Easter Sunday ever again!


The concrete pour on the footing happened this afternoon once the inspector signed off on the forms and everything. Fortunately, this crew has a great working relationship with the county so the permitting process goes a lot smoother than it could working with another contractor company. It's a joy to work with these guys.


I can't help but smile looking at the beautifully poured concrete footing with the bolts coming out of the top of it. That's where the framing for my new studio window will bolt into the new foundation.

It's all really happening!
Pin It!

Chapter 13: New beginnings and promising horizons are afoot at Rosehaven Cottage


New beginnings and promising horizons are in the forefront of my mind (my last post was about it). I have reason for them to be. We have several "new beginnings" happening around here. Hence, a new installment, Chapter 13, in the story of how Rosehaven Cottage came to be. And this time we're living through it as I write it.

'Our Lady of Guadalupe' is in full bloom again as if she's excited for the new beginnings too


Every year since 2000, when the winter rains come we've braced ourselves. We knew we were moving into the southernmost part of the rainy region of the "North Bay" and it's notoriety for deluge rain in the winter. What we hadn't anticipated when we bought this home was that our southern property line is, in fact, the lowest point on a long keyhole court with water draining downhill toward us from both directions. That's right... uphill to either side of us.

We soon realized why, during the first year of digging in the back garden, I kept finding completely buried brick walls that had once been part of a terrace system throughout the whole backyard. The water would run with such velocity diagonally across the yard that the 2-3 foot high brick walls were eventually buried in runoff silt, mud and dirt.

So over the course of time since our first winter in 2000-2001, we have installed a cleverly disguised drainage system throughout the back garden so the water is moved away from the house and under the garden instead of through it.

From February 2008: in the midst of installing the drainage system in the back garden.

From March 2008: after the drainage system was completed (click here to read more)

The last piece of this difficult drainage puzzle has been in front of the house.

Our driveway slopes downhill away from the street and toward the house. If the storm drain a few inches from the edge of our driveway is clogged with leaves and debris (as it was last Easter Sunday), water diverts down the driveway straight toward our garage. In 2005, after I had a strong intuitive feeling that we needed to do so, Hubby and my brother jackhammered out the 8'x8' section of driveway right in front of the garage door. They thought I was nuts to insist upon it... that is until 2 months later we had torrential rain that flooded many homes and garages in our town. Ours would have been one of them and we would have lost over a $1000 in building materials being stored there for the other restoration we were doing at the time.

Since 2005, we have had to live with an embarrasing gaping hole in our driveway. First, we filled it with pea gravel and then realized that wasn't the best solution because the neighborhood cats thought it was a giant litter box. Then we moved the pea gravel and used it elsewhere (I always have a purpose for pea gravel in our garden). It remained an empty "pit" for a few years that would get soggy and muddy every time it rained. The last couple of years, we've had larger rocks in it that are difficult for an ankle-spraining-klutz like me to traverse regularly. All the while we knew we needed a permanent solution, but funds had to go elsewhere (like when the south side of the house suddenly started sinking in 2008).

The embarrassing but very necessary hole in our driveway that we've lived with for way too long
Finally, this last spring we determined (thanks to a healthy income tax return) we could venture to ask for a bid for a permanent drainage solution to be put in by the same skilled company that had saved our house and its foundation a few years ago.

We also determined we needed the garage less as a garage (it's too narrow to pull a car into anyway) and more as a studio space for me where I would get the right natural light I need for photography. We concluded that if in the process of installing a drain, we also had a foundation footing constructed across the existing garage door opening it would be advantageous for two reasons. First, it would be further protection against flooding, and second, we could install a beautiful set of windows in the existing opening that would mirror the living room windows on the opposite side of the house. The light from the new east-facing windows would make the space ideal for the official headquarters of Rosehaven Cottage Inc. that currently resides in a bedroom with south- and west-facing windows that are not conducive to the work I do.

We had the foundation company come out and draw up a bid a few months ago and then had to wait for their very busy docket to free up so they could do our job. They are a reputable company with solid ethics and a phenomenal end-result, so they are in high demand.

In the meantime, I was able to get my head around the design of the new studio space; what I would be using it for; and how I was going to accomplish it.

Through much prayerful pondering on the subject, I was led to some conclusions about my own career path. My true passions were brought to the forefront of my mind--photography, historical research and preservation; digital restoration of rescued antique and vintage graphics on paper ephemera; creating digital art from photos and rescued images; and teaching.

I set goals for myself.

I spruced up www.RosehavenCottageStudio.com (my companion blog that focuses on my creative career).

Then I decided to completely overhaul my digital download shop and reopen it as an Etsy store at www.RosehavenCottageDownloads.com with the express purpose of using the proceeds to finance the buildout of my studio space. And I determined that I wanted to do most of the work myself while learning more construction skills and cabinetmaking in the process.


So that "new beginning" started for me about a month ago. And I must admit that writing about it here (or anywhere on my personal social media accounts) is a hard thing to do. I have a hard time being a self-promoter, because I'm always concerned that I will offend someone. But I finally realized that my friends probably want to know about the promising horizons I'm exploring. So I'm going against my natural tendencies and being more open about the goals I'm setting for myself.

There... I did it... back to the house...


Today (August 19, 2013), first thing in the morning, work began on we have waited so many years to see completed. It makes us emotional if we sit and think about it. We have waited so long for our little home to be truly safe in a rainstorm. And... it... is... finally... happening!

By mid-morning today, trenches had been dug for the foundation footing as well as the drain and drain pipe that would take water away from our house underground to connect to a storm drain box we share with our neighbor who also has to deal with flooding issues.


After the end of the workday, I felt it was okay to go out and take more photos. I didn't want to get in their way while they were working so I waited (Hubby took the ones above because he's braver).

The trench for the drain wraps around the corner of the garage and down our side yard to connect to the subterranean storm drain just on the other side of our fence. Our neighbors won't have to have anything dug up on their side. All the work can be done on our side.


The forms for the foundation footing are all constructed and ready for the concrete pour to happen once the county permit inspector gives them the thumbs up.


Another view shows the beautiful rebar work that's been constructed (well... at least we think it's beautiful).


Only a few feet away on the other side of the front porch, our highly prolific but completely unplanned 'Sweet 100' tomatoes are unaware of the goings-on. Planted by tomato-eating critters last summer, these volunteers have given us a produce garden this year even though we didn't think we were going to have one because I was out of commission when planting season was upon us with a back injury, then a cold, then a fibromyalgia flare-up, then another back injury. By the time I was actually functional, the volunteer tomatoes were already producing sweet, ripe, red fruit.

Once again, our needs are being met. We are being watched out for and blessed with what we need, when we need it.  I couldn't ask for more than that.

The 'Sweet 100' tomatoes the critters planted

Pin It!

Chapter 12: The gift of a kitchen sink


Click on any image view it larger and read the captions easier

As our first Christmas in the house approached, we settled into our routine of roughing it. We had a warm bed in the larger of two bedrooms downstairs. We had a toilet and tiny sink vanity upstairs. We had a bathtub and shower downstairs.

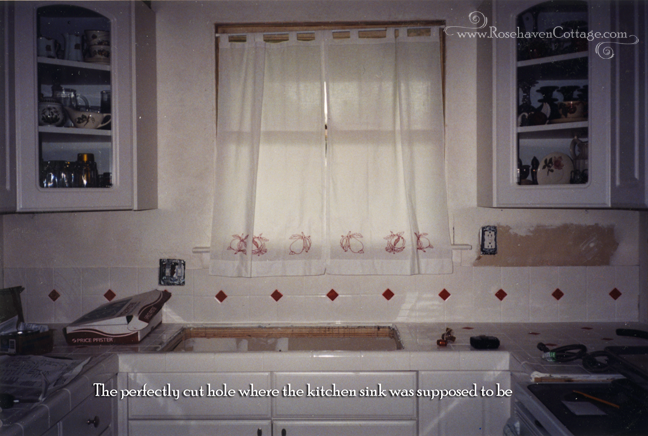
We had no kitchen sink anywhere.


Our kitchen lacking one critical element... the sink

When we had to use “the facilities”, we would trek upstairs to use the toilet up there. When we showered, we gritted out teeth and braved the chilly December air coming through the cracks in the subfloor under the newly installed bathtub and got in and out as soon as possible. When we had to clean a dish or utensil on the odd day we didn’t get take-out or go to a restaurant, we cleaned them in a small plastic bin in the bathtub. It reminded me a lot of camping.

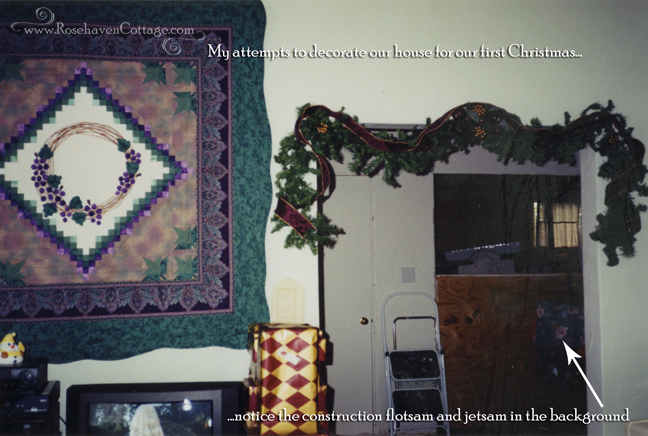
I had always been one to go all out for the holidays—decorating my current abode and filling the air with the smells of Christmas goodies. I figured I could still do a little decorating to make it feel like Christmas. That would have to suffice since we didn’t have a kitchen sink, let alone a clean space to roll out cookie dough. And since both of us were traumatized by the bathroom-plumbing incident, plumbing the kitchen sink wasn’t going to happen any time soon.

One Sunday only a couple of weeks before Christmas, I was sitting in the women's Relief Society meeting at church and the women were having a discussion about Christmas traditions. We were asked to share our Christmas traditions aloud. I sat there listening to wonderful suggestions. All of them sounded lovely—traditions I wanted to incorporate into our lives to make the season merry. But they all sounded so unattainable from the place we were at with the house.

I finally raised my hand and shared, “Every year for as long as I can remember, I’ve found joy in the Christmas tradition of baking cookies and making homemade fudge or English toffee from the recipe my mom had always used. But this year is different. I don’t even have a kitchen sink. So I’m learning that I have to find joy in the season in other ways that are within me. This year, I’m learning a valuable lesson about what the true meaning of Christmas really is.”

After the meeting, a newfound friend approached me and said, “If you really want to bake Christmas cookies, I have a wonderful kitchen with a big island that’s great for making cookies. You are welcome to come over any time and bake as much as you want.”

I was very touched by her thoughtfulness. Even though I couldn’t imagine myself taking her up on the offer, the fact that she had been willing to open up her home to me was gift enough.

Our attempts to decorate for our first Christmas


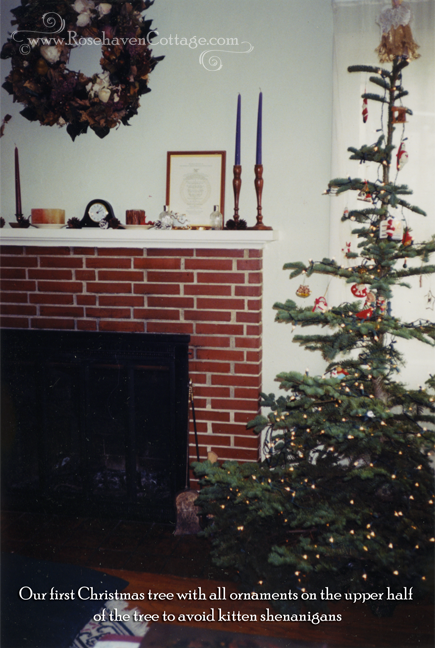
Our first Christmas tree in the house


Only a day or so went by, and we got a phone call from one of the men in our church congregation. He told us that his wife had been in the Relief Society meeting when I had made my comment. He then said, “You need a kitchen sink. I’m going to come over and install it for you. You will have a kitchen sink by Christmas.”

His blunt no-nonsense approach left us little room to object. Had he not said it in the way he had, Hubby probably would have simply said, “Oh thanks for the offer. We’ll call you when we’re ready,” and then let it go, never to take the man up on his generous offer. I think the man knew that, and he knew exactly how to approach the situation so he could get in to install that sink. He was bold. He was brief. And he meant business. He got Brent to commit to a day later in the week when the installation could happen.

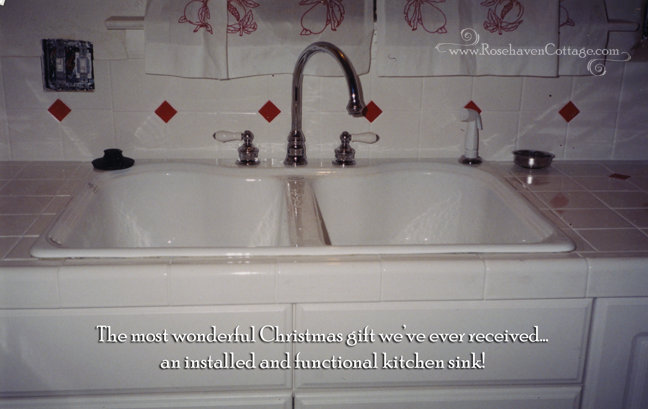
Later in the week, we had another newfound friend (and his wife) in our home. In one evening he installed the kitchen sink and fitted all the plumbing while his wife and I sat in the living room and chatted to get to know one another. In a few short hours, we had a running kitchen sink instead of a hole in the countertop. It was the best Christmas present anyone could have given us—running water in our kitchen.

That Christmas, I learned so much from the example of that couple. I learned what it really means to have a heart willing to serve one’s fellowman. Many people feel charitable at Christmastime. Often the benefactors of that charitable sentiment are bell-ringing Santa’s outside department stores or toy/food drives sponsored by local fire departments. The people who truly benefit from our charity are often faceless and far removed from us. That Christmas in 2000, I realized that not many of us go the extra step of seeking out and finding benefactors personally, and then taking the steps to serve them in the way they need it most.

In the past decade, I haven’t been able to live up to the example of the stellar couple that gave us the best Christmas gift we've ever received, but the bar they've set has me I’m always looking to try.

The most wonderful Christmas gift we've ever received... a kitchen sink!
Pin It!

Chapter 11: The birth of our kitchen


Click on any image view it larger and read the captions easier

Our "cave" of a kitchen before remodeling

Like everything else in the remodeling of our house, the kitchen had to be done on a very tight budget with as little money as possible. We tackled the issue of a normally costly kitchen installation three ways.

The first way to cut costs was to purchase unassembled kitchen cabinets and do the assembly ourselves on site. The second way to cut costs was to install the kitchen cabinets ourselves. The third way to cut costs even further was for us to build the countertops ourselves and then tile them ourselves.

Naiveté is such a beautiful thing sometimes. We didn’t have any experience doing any of the aforementioned work. But we had our handy-dandy Home Improvement 1-2-3 book from Home Depot with straightforward directions and illustrations, so we thought, “How hard can it be?”

Photo-6

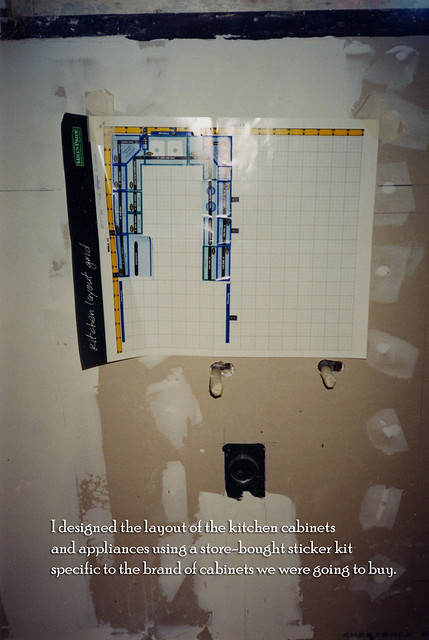
The first thing we bought was a ready-made layout kit made by the manufacturer of the cabinets we were going to purchase. It included a large page with a layout grid as well as sheets of various assorted stickers in perfect scale to the grid. The idea was to lay out the entire space using the provided stickers for walls, doors and windows. Then using the stickers for all the standard-sized cabinets for that manufacturer, you were supposed to lay out the kitchen (including standard-sized stickers for appliances). Once the layout was to your liking, you could go to Home Depot and buy the cabinets using the product numbers on each sticker in your layout.

So that’s what I did.

I’ve been drawing floor plans for fun since I was 8 or 9 years old when I had aspirations of becoming an architect when I grew up. Laying out the floor plan of our kitchen using the sticker kit was a real treat for me. I figured out exactly what cabinets could fit and what configuration was the best for the diminutive space.

After I was done, we went and bought the whole kit and caboodle of various cabinet kits and doors. We had to place an order because they didn’t have them in stock. Our order came in, we got all the boxes home and, before we started to assemble the cabinets, we took the time to watch the DIY instructional video that had come with them. It was dry and boring, but we didn’t want to do anything wrong so we watched it all the way through. Over and over the monotone narrator would instruct how to construct the box that would become cabinets using cams and bolts. Again and again he would warn, “Do not tighten at this time”. By the end of the video, the only thing we really remembered was “do no tighten at this time”.

Photo-7

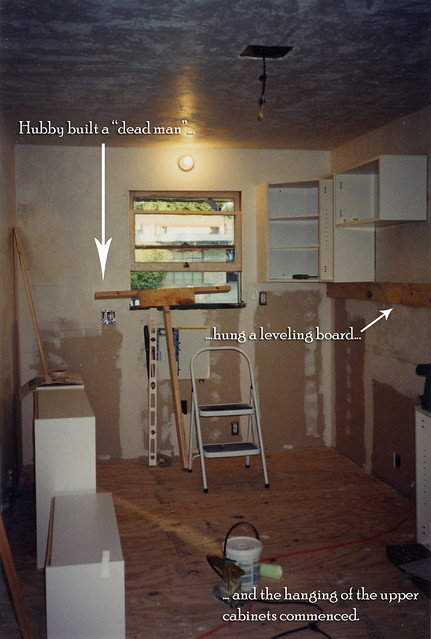
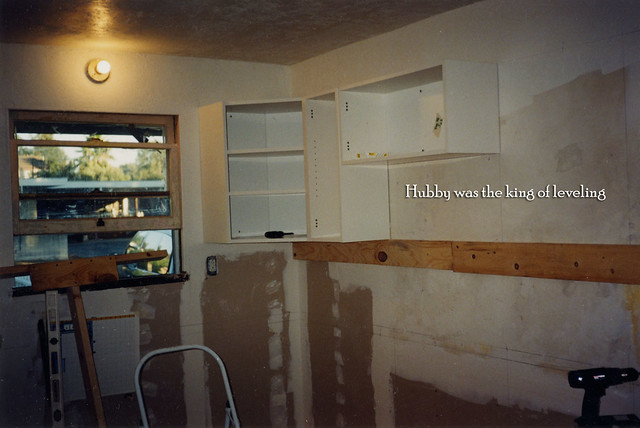
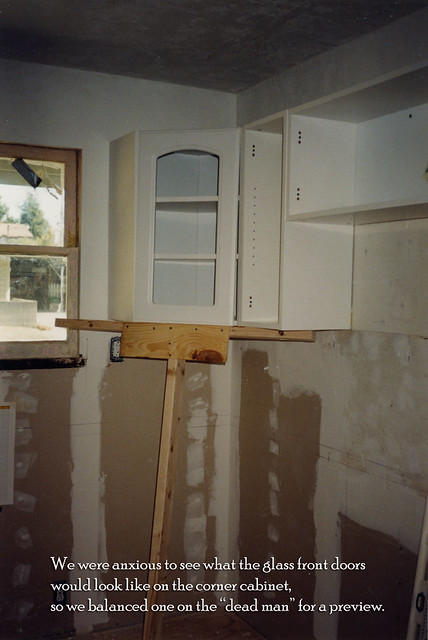
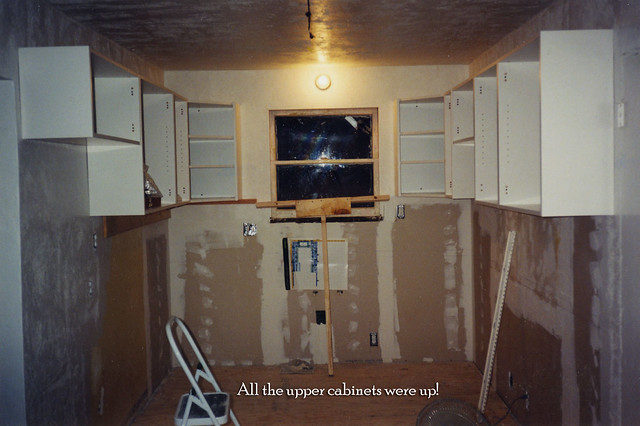
The upper cabinets had to go in first. Hubby built what is called a “dead man”—essentially a pair of 2x4’s in a T formation to prop under the bottom edge of a cabinet while attaching the cabinet to the wall. Hubby also installed a temporary leveling board on the first wall to aid in the process.

It was my job to put together the cabinets. I love puzzles and the assembly of cabinets (or furniture… even IKEA furniture) feels like putting together a puzzle to me, so I enjoyed it.

Photo-8

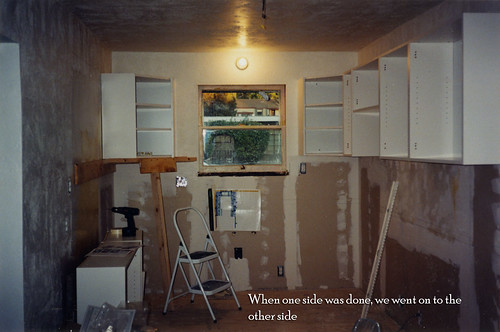
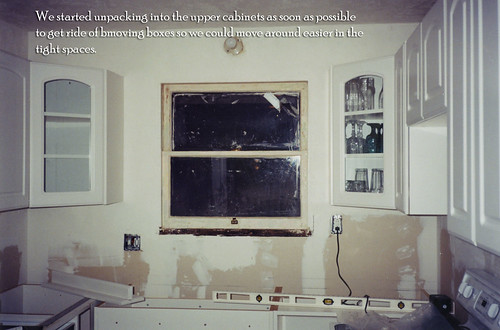
One by one each upper cabinet went up on the first wall until we were ready to begin hanging the cabinets on the opposite wall of what would be a galley-style kitchen layout. With each cabinet installation, we learned how to do it a little more efficiently and little faster.

Photo-9

Photo-10

Photo-11

After the upper cabinets were in, it was time to put in the base cabinets. Base cabinets are bit trickier in an old house with unlevel floors because you can’t simply draw a level line on the wall and hang them. Each cabinet has to be leveled independently with shims (triangular pieces of wood). Shimming made the process go slower than hanging the upper cabinets. But we managed to complete that too.

Photo-12

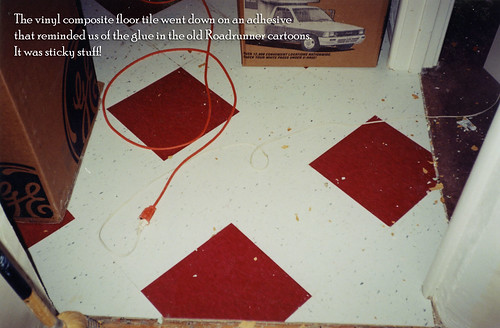
Once all the base cabinets were in, we could finally lay down a real floor on top of the plywood underlayment that had been our floor surface up to that point. We chose a vinyl composite tile (exactly like commercial floors) for its vintage look as well as its durability as we knew that during the rest of the phases of construction that the kitchen floor would have to survive a lot. The tiles (made by Armstrong) had to be installed using a caustic smelling runny adhesive that came in large buckets. The adhesive had to be troweled on with a specific toothed trowel, left to sit for a couple of minutes, and then the tile could be set on it. We learned to do workable patches of adhesive instead of trying to trowel large areas. We found ourselves laughing as we repeatedly got hands and shoes stuck on the adhesive because it was just like Wile E. Coyote in the old Warner Brothers Roadrunner cartoons with his “Acme glue” getting stuck on the railroad tracks right before a train bears down on him. We laughed as we joked about the possibility of a train barreling through our kitchen while we were stuck to the floor.

Photo-13

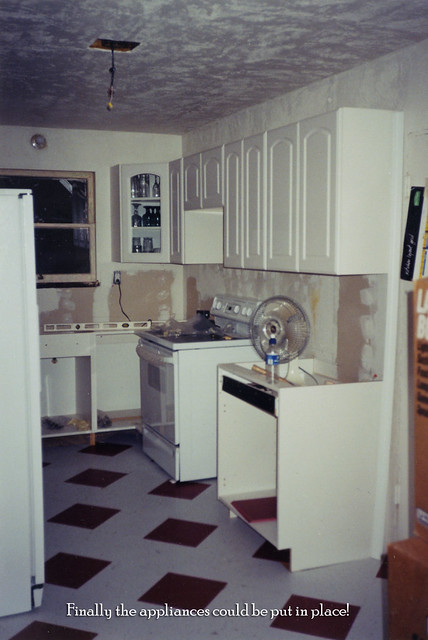
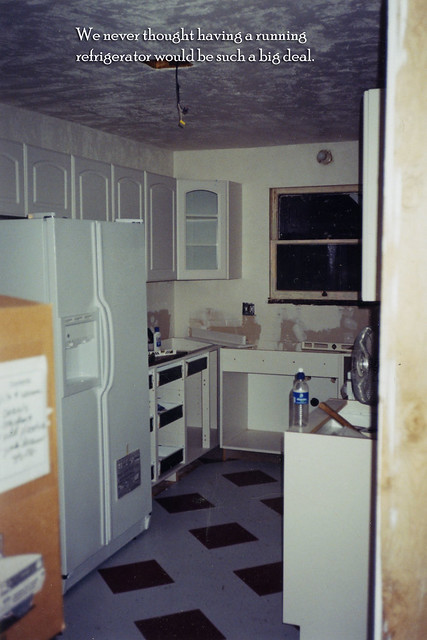
Once the floor tiles were all in place, we were able to move the appliances into their proper “homes” in the kitchen and free up much-needed floor space where they had resided after being delivered earlier than we were ready for them. I cannot express how wonderful it was to hook up the water line to the refrigerator and plug it in. The hum of an operating refrigerator was one of the best sounds in the world. We could finally keep food at the house because we could refrigerate it. And we had filtered and chilled water on tap! I never thought I would appreciate having a refrigerator so much. I was (and still am) reminded of how blessed I am to live where I can have this amazing luxury.

Photo-14

Photo-15

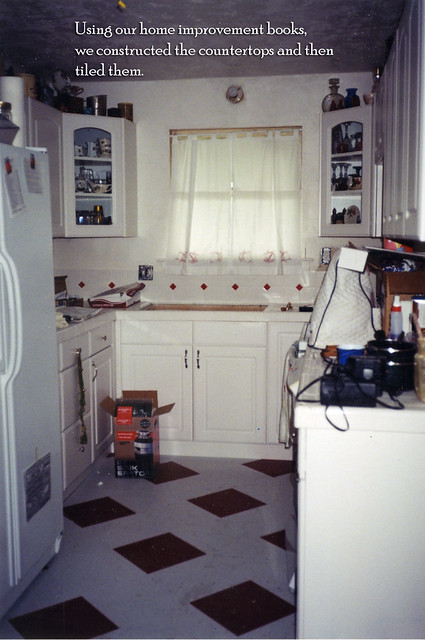
The next phase of the installation of the kitchen was the construction of the countertops. The original countertops had been tile, so we decided that we would stay true to the era of the house and put in tile. Our archangel in overalls had gone back to university so we were on our own with this tiling job. Turning to our handy-dandy home improvement books again, we read up on how to build tile-ready countertops. Again, naiveté was a blessing. We dove right in and built the plywood underlayment on all the base cabinets and then, working as a team, we tiled the countertops the way we had seen my brother tile our shower. We borrowed Josh’s tile saw he had used to tile our bathroom, and Hubby did the cutting while I did the measuring and laying of the tiles. I used the smallest tile spacers I could find so the grout lines would be the smallest I could make them. Then I went back in and grouted using a technique I came up with on my own. I put the grout in a large Ziploc bag and twisted it down like a cake decorating or pastry bag. I cut the tip off the Ziploc and piped the grout into the fine 1/16” grout lines before pressing the grout in with a grout paddle followed by a wipe down with a wet sponge. It worked! The grout has lasted for almost 11 years and is pretty easy to clean compared to wide grout lines.


Photo-16


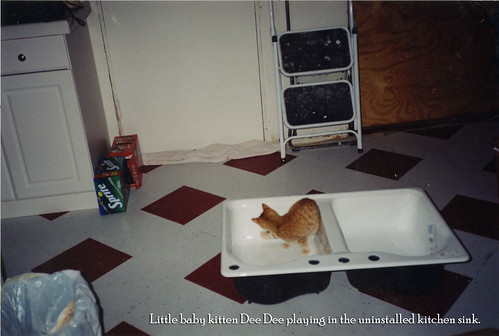
We bought a beautiful cast iron Kohler sink, but because of the traumatic plumbing incident in the bathroom, the kitchen sink sat on the floor uninstalled. We were just so thrilled to have a fridge and stove we were willing to do dishes in the bathtub, especially if it meant preventing a fiasco like the flooding of the bathroom.


Photo-4

Pin It!

The former "Danger Room" that is now the "Tiki Room"


To see photos of what the "Danger Room" looked like when we first bought our house click here.

Because the "Danger Room" was such a horribly ugly room when we first bought our house, it seemed fitting to transform it into a room that was fun and playful instead of a dark dungeon. Early on in the renovation process, I decided that since one whole wall of the room was the sliding glass door that exited out to our back garden, it should be decorated like a sun room or conservatory. The idea eventually grew into a post-WW-II-Hawaii themed look. As the room transformed, the name of "Danger Room" also needed to transform. Being huge Disneyland fans, Hubby and I ended up calling it the "Tiki Room".


Yesterday, I finally had the wherewithal to tackle sanding and resealing the floor in the Tiki Room. Although we installed oak floors years ago, they had been pretty beaten up with construction traffic over the years. So it was time for a spruce up.

I got a quick drying finish at Ace Hardware that dries to the touch in an hour (sometimes less). With a small hand-sander and this quick-drying stuff, I did the floor in patches so I could move the furniture around as I went. At around 7 pm last night, I finished the last patch (much to Hubby's amazement). Now I just have to do the same thing to the stair treads.


Pin It!

Chap 10: Our first winter descends upon us

Click here to start at the beginning of the story of how Rosehaven Cottage came to be

Click on any image to view larger and read captions easier


As the Christmas holidays of 2000 approached, the cool and rainy weather came. In our climate (a Mediterranean one similar to the South of France or Italy’s Tuscany), we don’t get rain all summer. The relieving rains finally come some time in October, with some of our first good storms occurring in November. By late November, the overnight temperatures hover in the 30’s-40’s (0-5 Celsius) and we begin to get our seasonal overnight fog. We were pleasantly surprised to find that our proximity to a major waterway leading to and from the San Francisco Bay (the Carquinez Straits) had a wonderful benefit—we could hear the fog horns late in the night as tankers and other cargo ships navigated the straits. I’d always wanted to live in a coastal town after having grown up in an inland valley. This was the closest I had ever come to realizing that dream. The fog horns' soft mournful sighs in the foggy distance late at night were a welcome sound.

The chilly nights were a stark contrast from what we had experienced when we first moved in during the heat waves of July and August. Chilly nights spent in an old house make one aware of every little draft—and we had many. The hallway floors had been removed, exposing the pine sub-floors with significant spaces between them. Cold air rushed in the quarter-inch cracks and chilled our feet when we traversed the hall between the bedroom and the bathroom. Edges around doors, such as the bottom edge of the door leading to the garage, were drafty too. We finally had to shove a towel under that door to keep cold air from flowing in and completely defeating our heating efforts.

The worst culprit for drafts was the room we had come to “affectionately” call “The Danger Room”. This room was part of the addition that had been built onto the house in the early 1960’s. The décor was indicative of the era and was completely out of sync with the rest of the late 40’s bungalow-style design of the house. My brother had told us of a similar room he'd seen in a friend's home that he had dubbed "The Danger Room" because it looked like all it needed was a mirrored disco ball hanging from the ceiling and techno/rave music blaring and it would make a perfect dance club called "The Danger Room".

The name stuck.


In the Danger Room, were the stairs that led to the half story that was also added in the early 1960’s. The stairwell appeared to be finished until one got halfway up the stairs and realized that the ceiling of the stairwell and the side wall into the large walk-in attic adjacent to the half story upstairs were completely unfinished. We could see the roof joists; the layer of roofing boards with the ends of shingle nails poking through; and the underside of the tar paper on the roof.

In the summer, going up the stairs was an interesting experience. Halfway up the stairs, the temperature around your head would suddenly rise to that of the interior of an oven. If you continued past the top of the stairs through a door into the large room that constituted the upstairs, then the temperature would go back down because the room was insulated. The stairwell wasn’t. It had never been finished since it had been built almost 40 years prior to us buying the house. That fact always baffled us.


With the cold nights of November and December, we discovered that this same un-insulated stairwell was now a draft corridor of major proportions. The cold air from the un-insulated attic that poured in large screened-permanently-open attic vents would come rushing down the stairs seeking the low point in the downstairs living areas. And we had two little kittens that wanted to do the exact opposite by rushing up the stairs and straight into every dirty nook and cranny of an attic space that hadn’t been cleaned in over 50 years.

Something had to be done.

The connection point between the old house footprint and the Danger Room was an 8-foot opening that probably had been a sliding glass door originally. Being an 8-foot opening made it the perfect dimensions for two standard sheets of plywood to be hung to block off the opening. It was the only way we could stay warm and keep our two curious kittens out of harm’s way. So up went the two sheets of plywood. Seemingly miraculously, our house became a whole lot warmer. Yes, we still had drafts coming in the floor in the hallway, but those were remedied somewhat with brown flooring paper and throw rugs.

Getting in and out of the Danger Room to get building supplies that we stashed in there was a bit tricky, so we eventually cut a door in the plywood and put it on hinges. With a sliding lock in place, it became a good makeshift passage door.


Sometime in late November, we experienced our first real rainstorm of the season. The rain came down in more volume than where we had lived only 35 miles south (one of the interesting characteristics of the micro-climate phenomenon of the San Francisco Bay Area). As the rain came pouring down in that first storm, we were confident that all would be fine because we’d had a full house inspection during escrow that had deemed our roof in good condition. Well, the inspection hadn’t checked the flashing along a seam in the differing roof lines between additions. Water came running in along a roof joist, followed gravity down, and ended up running in a steady stream straight into the middle of the Danger Room. At the time, we had no idea that a bent piece of flashing was at fault and we couldn’t climb the roof in the storm, so we put out pots and pans to catch the water and emptied them as they filled. We were truly living in a scene out of a movie—pots and pans filling with rainwater and all.

Fortunately, my brother came to the rescue during a break between storms and discovered the offending flashing. He straightened it and secured it with a nail or two. The leaks stopped and we haven’t experienced one since.

We learned a valuable life lesson during that first November and December. We learned to appreciate having a roof over our heads that kept us dry. We learned to appreciate having a warm draft-free home that kept us comfortable despite the elements. To this day, I often find myself including those two things in my prayers of gratitude, because I know there are still many in this world that live without one or both. I no longer take either of those blessings for granted.

Pin It!

© 2007-2015 All rights reserved by Cindy Garber Iverson.
All images, photos and writing
(unless otherwise noted)
belong to Cindy Garber Iverson.
Use of content in digital or print form is strictly forbidden without written consent.
Just ask... I may say "yes".
Photography Prints
celebrations.com Invites & eCards
//Pin it button