A Peruvian Daffodil It Is!

Thanks to West Coast Island Gardener and Sylvia (in England) I now know that this little surprise in my garden is a peruvian daffodil!

Thank you both for helping me identify this exotic looking treasure. Like I said in the last post... I don't remember acquiring it or planting it. But it appears to have ended up in my garden all the same.

I'm sure the bulb was probably mixed in with a large lot of daffodil bulbs I got a year or two ago. That would explain it.

ADDENDUM: If you want to see a better photo of this lovely flower, head on over to Kylee's Our Little Acre.


Click here to follow me on Twitter
Pin It!

Secrets Within My "Secret Garden"

Continuing on from the last post...

There are nooks and crannies everywhere throughout the front garden that hide little pretties here and there. I love taking a slow stroll through the garden and spying new discoveries that are growing on their own--most without any intention on my part.

The square green pot on the front porch right next to the red front door is one of those spots. It seems that it is a favorite place for volunteers to pop up. Earlier this spring it was the site of my volunteer sweet peas and then some blue lobelia spilled forth on the backside of the pot in late spring.

Now there is a lovely crop of morning glory vines with their heart-shaped leaves and deep blue blossoms. This dark variety of morning glory is called Grandpa Ott.

Last summer, I received some plants from my dear friend who's a horticultural guru and instructor at our local college. After enjoying them immensely, I let them go to seed at the end of the season last fall, letting them wither and dry up. Then I popped some of the seeds out and poked them into the soil of the pot sometime in January. I didn't know if they'd sprout or not. Looks like they did!

This year's flowers have stayed true in color to last year's "parents". The blue is so dark and deep I feel like I could fall into it. I just love it! It speaks to my passion for blue flowers.

What's really neat about this batch is that the vines don't send out their blossoms all at once. It's like each flower gets its own turn to have a show before the next comes on stage.

Because the pot is right next to the door, I can keep a really good eye on what's trying to surprise me there.

But there are so many other spots in the garden that aren't like that. I have to get really "up close and personal" in order to see some of the secrets hidden elsewhere. And sometimes things are hidden in plain view. Just take a look at this.

Does anyone know what kind of lily this is? [You can click on the image to make it larger if you need to get a closer look.]

I'm assuming it's a lily. I don't remember planting it. I've never had it before in the garden, nor have I ever seen it before EVER.

Is it a spider lily? I almost missed this completely because it's growing in the midst of some bunches of blue fescue grass that camouflages it expertly. Even photographing it was a bit difficult. But I had to post it so I could get some idea of what it is. Talk about a surprise.

About 3 feet away is another set of shoots with thick waxy leaves coming up that look very similar to this one's leaves. I'm wondering if I'm going to get a two-fer surprise. Wouldn't that be neat?!?!


Click here to follow me on Twitter
Pin It!

View from the Kitchen Window into my "Secret Garden"

Click on any of the photos to enlarge them.

Hubby is the king of the kitchen around here. It's his domain. I don't complain, since he lets me have the garden shed all to myself.

Our kitchen isn't big--perfect "cottage size". Hubby likes it that way. He says that his "work triangle" is perfect in that space. Over the kitchen sink is a window that looks out into our smallish front garden. I think that's one of the reasons he likes the kitchen so much (just a hunch).

When I came in from taking garden photos today, I realized that the view from the kitchen window is really pretty right now. That's probably why Hubby had the window open to let the cool breezes flutter in and air out the house after its been closed up for a week during the heat. Even though I had to shoot through a screen, I took a photo out the window so I could share it here.

The bright pink billows on the lower right are the "Raspberry Ice" bougainvillea that is resting atop a mature rosemary hedge. Behind the bougainvillea you can see the tall yellow spindle blossoms of the fennel, looking a bunch of bare umbrella frames stretching to the sky. The round shrub just to the left of the fennel is my "Pineapple Sage"--a variety of salvia that smells just like fresh pineapple when you crush the leaves (I have a honeydew variety that's wonderful too).

I walked out into the road in front of Rosehaven Cottage so I could photograph it with all the blooms on the pergola. The white flowers on the right of the pergola are a "Lady Diana" bower vine. The left side of the pergola and picket fence are covered in red Japanese honeysuckle with some bougainvillea poking through here and there.

You can see a little corner of the white kitchen window shutter (I drew an arrow on the photo to make it easier to see).

From inside the kitchen, the garden looks like a little enclave of blooms and greenery. So many people have been surprised the first time they walked under the pergola to find the garden within.

It's my own little "Secret Garden" of sorts. There's a line from one of the film adaptations of "The Secret Garden" that always come to mind when I'm in the garden--"curtains and fountains of roses" is the line. I think maybe I've been subconsciously using that movie line as a pattern for my plant-as-you-go form of garden design which has resulted in what we have now.

Stay tuned for the next post when I share more shots of the blossoms that are in my "Secret Garden" right now...


Click here to follow me on Twitter
Pin It!

The Love Runs Deep (200th post)

I had already planned to write about these two photos today before I realized it would mark the milestone of being the 200th post. Now the post seems even more appropriate for the occasion.

The two photos I'm sharing in today's post are of my great-grandparents, El and Bill Munce. I am very fortunate to have hundreds of candid photos like this of them, their families, their outings, their lives, and their silliness.

These two particular photos are part of the early part of an antique album that is in the loving care of my aunt. The album spans the entire 16 years of their marriage (their marriage ended prematurely due to El's tragic death after the birth of their youngest son).

The photos were taken around 1910 here on the rolling hillsides of the San Francisco Bay Area with my great-grandparents' simple little portable camera of the time (hence the slight blur in the photo of El). If the photos were in color, the hills would probably be a lovely green because that's when the wildflowers that Bill and El were out hunting and picking would have been in bloom--probably sometime around March.

Bill was a lover of gardening, grafting, planting, growing, and roses. I love this photo of him with an armload of wildflowers. This is my kind of man. The photo of El with the armful of flowers seems expected, but not the one of Bill. It's literally a snapshot in time--a special moment between two young honeymooners captured in perpetuity. I can imagine them out as a couple traipsing these hills I love so much. I can imagine their excitement at taking the snapshots and then their anxious anticipation for when they would get the photos developed so they could relive the moment.

I'm glad they captured this moment. Somehow it gives me a sense of who I am. I feel a connection to them, to these hills, to the flowers. It all helps me feel grounded, rooted. My heart swells with a gratitude for the legacy they have left--a legacy of loving nature and gardens that has been passed down through their daughter to her daughter to me.

I garden in almost the same climate as my great-grandfather gardened in only a half-hour drive away from where he gardened. When I am out in my garden tending my fruit trees, pruning my roses, or tying up my climbing vegetables, I feel him near. I've seen so many photos of his garden, I know it is much like my own.

Thank you, Grandad, for being the man that you were. Thank you for loving all the things that I love, especially the roses. Thank you, Grandma El, for loving the flowers and for loving nature so much that you hiked the hills and valleys in those dresses you had to wear. And thank you, both, for loving each other as deeply as you did.


Click here to follow me on Twitter
Pin It!

Go ahead... don't be afraid... get creative!


My regular ol' rose photo became my sidebar graphic
using Adobe Photoshop Elements


I've had such positive comments about my new self-created blog template that I decided to share my "secret"--Adobe Photoshop Elements.

Now hold on... I can tell some of you are getting ready to phase out at the mention of the "scary" PHOTOSHOP!

Not so fast... take your cursor away from the back button.

I have to admit that even as a trained graphic artist, Adobe Photoshop Elements was the only way that I could get excited about the Photoshop product. There were two reasons:
  1. Photoshop Elements was the only thing I could afford
  2. The full version of Photoshop was just too dang scary (THERE! I said it!)
Adobe decided a few years ago to offer a less expensive and less "scary" version of Photoshop to users that aren't graphics and photo professionals. What they created was Adobe Photoshop Elements. It has the best features of the full version without the hefty price or intimidating interface. The developers made effects, borders, and frames available with one click of a button so that digital scrapbookers, artists, bloggers, and photo hobbyists could enjoy the great effects without the time-consuming learning curve.

A year ago, I got my copy of the software bundled with Adobe Premiere Elements (the scaled down version of their video editing software), and it cost me less than $100 USD (actually less than $50 USD with a sale and rebate combo I took advantage of). That took care of the first reason why I didn't have it.

Once I got the software home and loaded on my PC, it was so user-friendly that I could navigate around without feeling intimidated. Just by poking around and playing, I taught myself the software. I ventured into my own projects and learned as I went (I learn better that way).

After about a year of navigating my way around in Photoshop Elements, I recently ventured into the territory of its big brother/sister, Adobe Photoshop CS3. This week I've been immersed in self-training through book tutorials, CDs, online videos, and supplementary specialty publications. I'm so immersed that I'm dreaming in layers, palettes and menus.

Here's the funny thing...

I still go back to Elements. Here I am immersed in training on the "Mac Daddy" of photo editing software and just today I went back to Elements to create a new desktop (wallpaper) image for my computer. Why I feel guilty, I'll never know... they're both Adobe products. I'm not "cheating" on anyone.

Anyway...

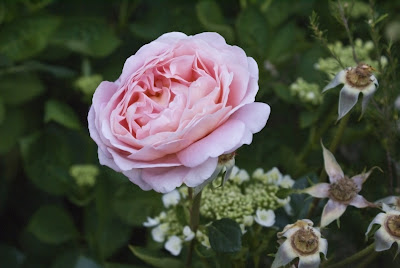
The photo of my Abraham Darby rose that started out looking like this...


...turned into an image with a vintage/sun-faded look
(perfect for my computer desktop)
with just a couple of easy clicks.


So fun. So easy. So rewarding!

Okay, have I convinced you to be brave and create? I hope so. It's easier than it seems.

Pin It!

Flowers for Friday


Click on any image to enlarge

Top left: Purple glads in the front garden
Top right: "Gold Medal" roses blooming in front of Rosehaven Cottage
Bottom left: Peachy colored gazanias in the front garden
Bottom right: The first echinacea blossom of the year (commonly known as coneflower)


Click here to follow me on Twitter
Pin It!

© 2007-2015 All rights reserved by Cindy Garber Iverson.
All images, photos and writing
(unless otherwise noted)
belong to Cindy Garber Iverson.
Use of content in digital or print form is strictly forbidden without written consent.
Just ask... I may say "yes".
Photography Prints
celebrations.com Invites & eCards
//Pin it button